Overview – AKS
We all know the story – your team gets access to a cloud provider and the first month everyone is happy and engaged. DevOps teams quickly spin up multiple Kubernetes clusters for development, test, and production environments. And it’s all beautiful… until the first invoice comes. Suddenly it’s not so colorful anymore.
What did AKS do with my money?
It’s easy to provision an Azure Kubernetes Cluster (AKS) – simply start the wizard and click “Next” until it’s finished. However, this simplified approach might cost you a lot of money. Cloud vendors are not eager to decrease your cloud spending, thus it takes some time and effort to find all the possible ways to do it.
There are multiple ways you could keep your AKS spending under control. Here, we gathered some of the most important ones:
Using spot instances
Azure cloud is often underutilized, customers do not use lots of computing power. This unused capacity led Microsoft to offer a new type of Virtual Machines – Spot Instances. They are a lot cheaper than a normal VM and can be evicted at any time. This makes spot instances ideal for development & test environments, but not so much for production. Unless you are fully aware of how spot instances work and what risks they have, you should not apply this to production environments.
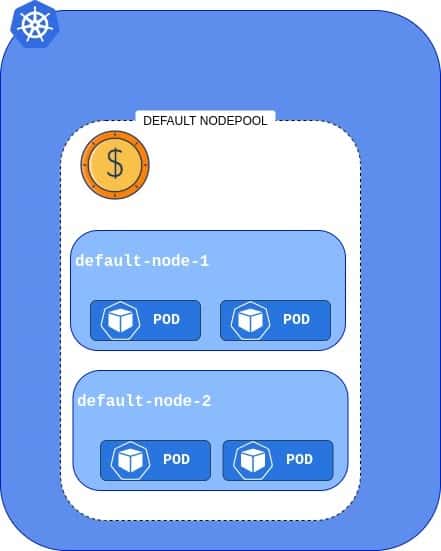
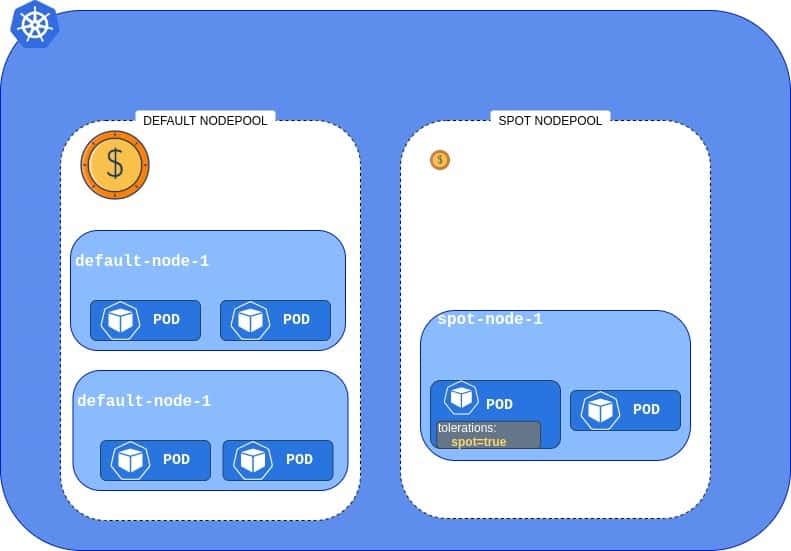
AKS can use Spot Instances as an additional Node Pool, that is underneath mapped to Virtual Machine Scale Set (VMSS). Let’s take a look at how default AKS looks like in terms of Node Pools – a cluster with a single, expensive Node Pool.
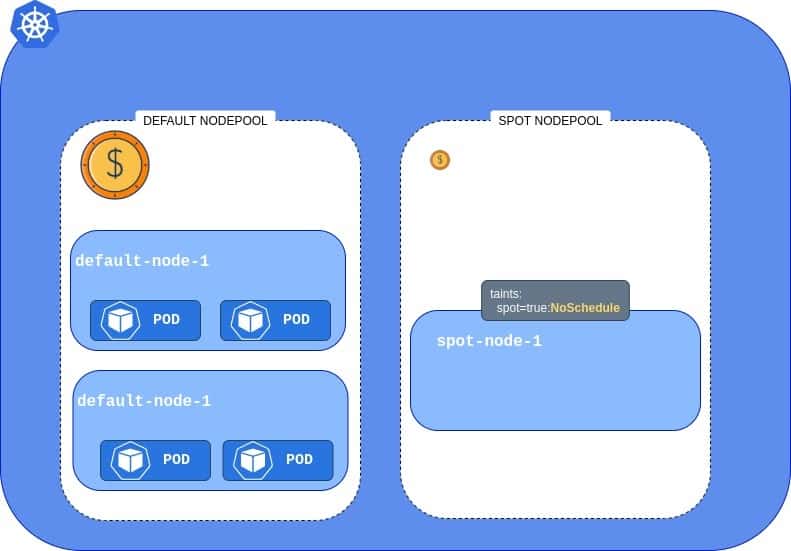
Now, what happens if we add the cheap Spot Instance Pool? We can see that the cluster now has two Node Pools, but the one we added is a little different – it has a special taint. It makes the new Spot Pool unavailable for all workloads.
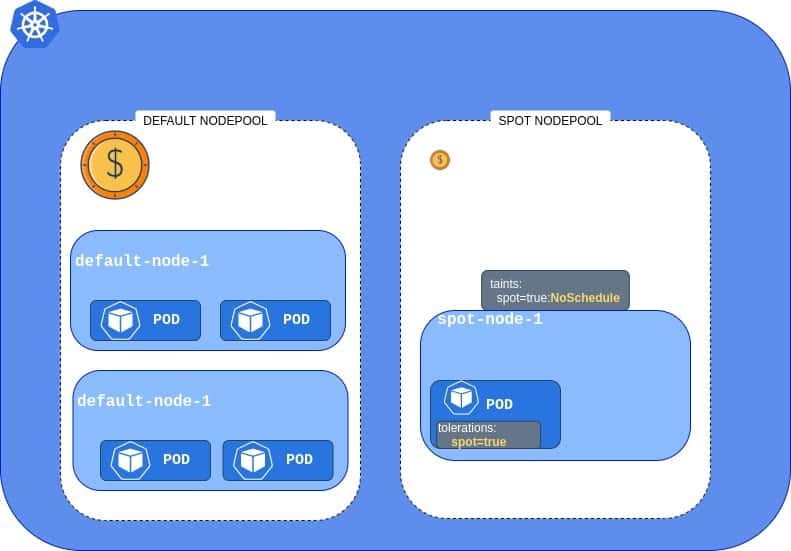
One possible solution is to adjust our deployments’ YAML files and add a toleration, which will allow Pods to be scheduled on the tainted Node.
However, if you don’t want to change your deployments and allow every workload to run on cheap nodes, you can do it by automatically un-tainting Spot Instance nodes. To do this, you need to create a Daemon Set with the below script – it will run on every node and remove the taint.
kubectl taint node ${NODE_NAME} kubernetes.azure.com/scalesetpriority-
This way all pods will be able to utilize Spot Instance
Utilizing Spot Instances can bring you up to 90% cost savings compared to the standard instance types.
Scheduling cluster shutdowns
Developers are very resilient human beings, they can work long hours without breaks as long as there is enough coffee in their tank. However, even the toughest developer needs some time off. This is why it’s beneficial to create a startup & shutdown schedule for your non-production clusters. The simplest, yet most effective strategy would be to keep clusters up & running during business hours and completely shut them down on weekends. Such a scenario is possible to implement using the Terraform autoscale resource or directly on the VMSS configuration page.
Clusters timeline could look like this :
Instead of having test infrastructure up for 168 hours a week, you only power it up for 45 hours. That is a 73% cost reduction.
Using Cluster Autoscaler and HPA together
Nobody knows upfront how much computing power the production traffic generates. When you create an AKS cluster, the number of nodes is usually set using the “not too much but not too little“ paradigm. This approach might work at the beginning, but as the traffic grows, and applications demand more CPU and memory, you might end up adding & removing nodes every day manually.
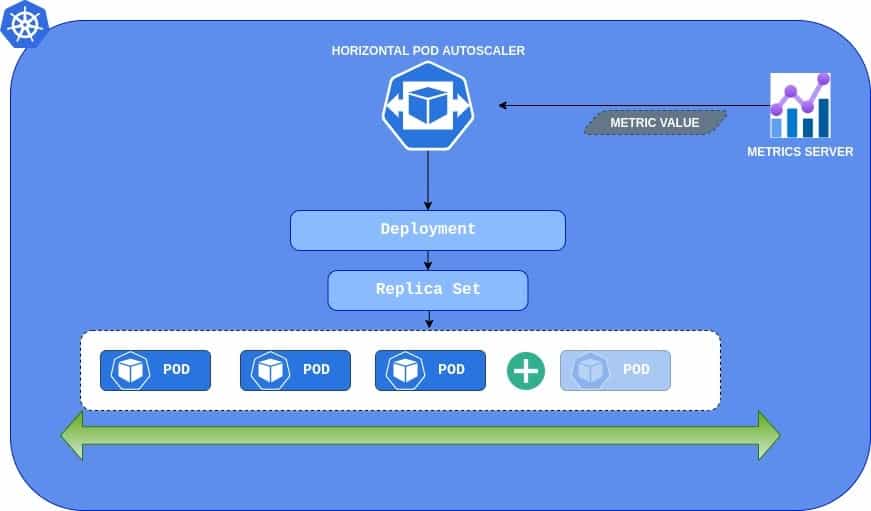
This is when it’s important to invest time into the proper configuration of Horizontal Pod Autoscaler (HPA) and Cluster Autoscaler (CA). Properly configured HPA will maintain the optimal number of pod instances so that your application will be able to perform. In the event of higher load- HPA will dynamically add new instances. After the load peak, HPA will get rid of no longer needed pods. To answer the question “When should I scale my application” you can use basic metrics like CPU or memory usage. You could also use custom metrics provided by, for example, Prometheus, and start scaling your API when it starts to respond slowly. Another possibility would be to scale the deployment when there are lots of events stored in the Azure Service Bus. The last one requires an extra adapter to be installed.
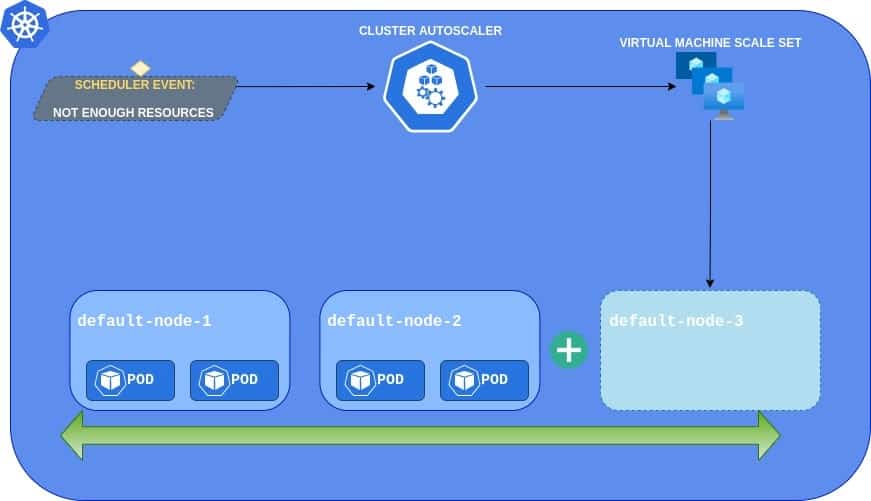
While HPA works on a pod level, the Cluster Autoscaler operates on nodes (Virtual Machines). It’s a tool to right size Kubernetes cluster. It will watch for events like “can not schedule due to insufficient CPU/MEM” and dynamically provision a new Virtual Machine using Azure API.
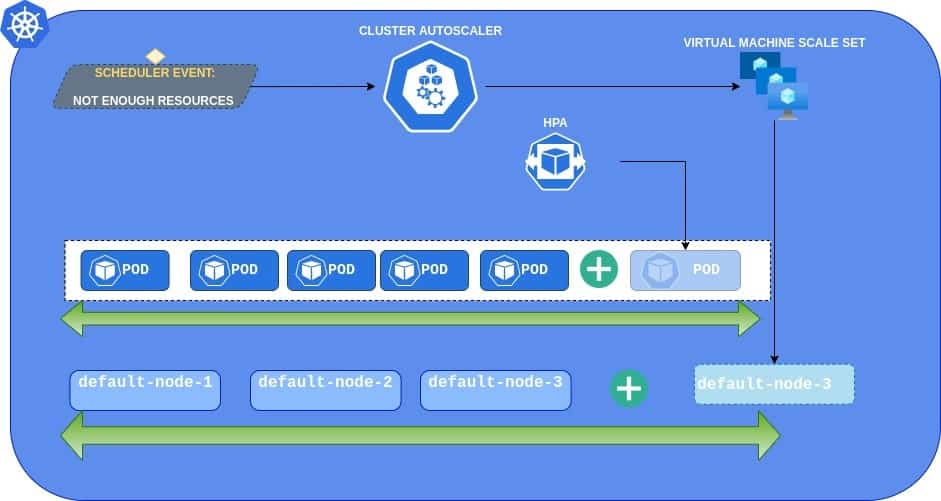
Cluster Autoscaler and Horizontal Pod Autoscaler together bring the ultimate solution for auto-sized clusters. You can provision and pay only for the resources that are currently needed. If the load is low, the cluster will remain small. If the load will grow, then HPA will start scaling up the pods, which will trigger CA to provision a new node. When the storm is over, everything will scale down.
Using Reserved Instances
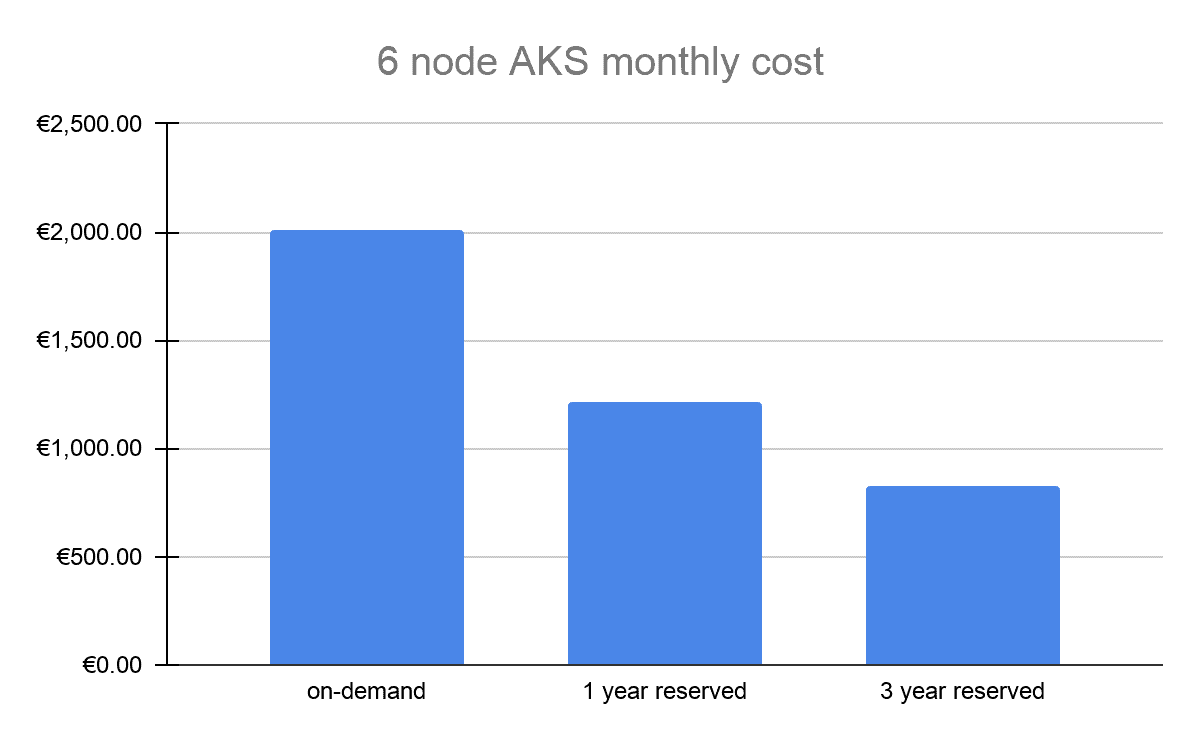
If you plan to keep your environment up & running for at least a year, then using Reserved Instances will give you immediate cost reduction with little effort. Cost savings of up to 72% compared to the standard price. The only downside is that you lose some portion of flexibility- you are tied to the cloud provider and instance type you reserved (although the reservation can be applied to the flexibility group). It’s worth spending a while to analyze your workload and choose the optimal instance type for upcoming years. Azure gives you the possibility to cancel the reservation, but it comes with an extra fee of 12%.
Below you can see a cost-saving chart for a 6-node AKS cluster comparing on-demand instances with 1 and 3 years reservations:
Keep in mind that with a reserved instance you are paying for a 24×7 reservation, so it does not make sense to use it with clusters that are not running full-time. It also makes little sense to reserve virtual machines in subscriptions where you plan to use Spot Instances.
Sizing node pools
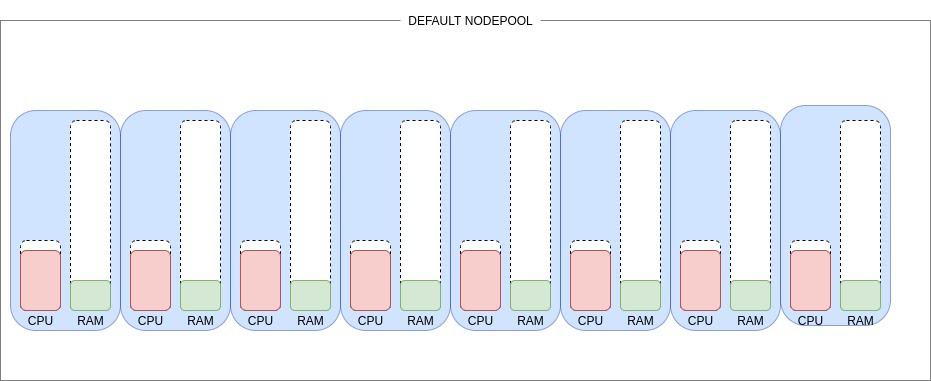
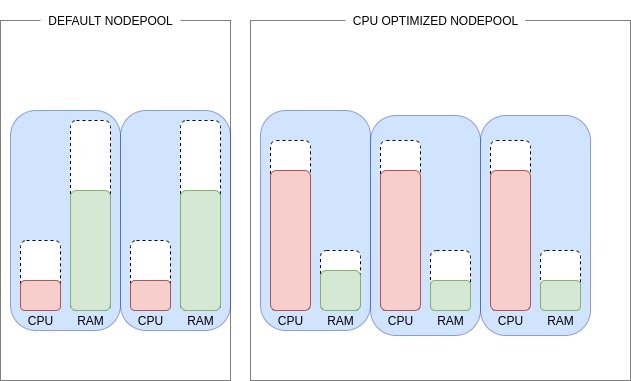
It’s often the case that a single Kubernetes cluster is running different types of workloads – databases, web servers, application servers, etc. Each one of those might have completely different demands when it comes to computing resources. Databases are usually hungry for memory while application servers need more CPU. Placing all of those workloads in the same type of VMs might end up in additional costs due to poor resource allocation. For example, you could be paying for 8xD12s instances to allocate all your workload, but if you look closer at resource usage, you would notice that you are utilizing almost 100% CPU and barely 10% of RAM.
Some of your workloads have high CPU demands so maybe it would be better to allocate them in a CPU-optimized node pool composed of 3x Standard_F8s_v2 instances and 2xD12s.
The above example results in almost 36% savings.
Watch out for extra costs
When it comes to Kubernetes cost optimization, often the cost of log storage is not considered. However, in very noisy environments, where applications are set to debug-mode, they can generate a huge amount of logs. The cost of Log Analytics can unpleasantly surprise you. You can configure daily ingestion limits for your workspaces to avoid extra costs. However, be careful because once the limit is reached you will lose data for the remainder of the day. That is why we recommend setting it in dev/test environments, together with an alert to inform you when the limit is reached.
Azure Defender is a great tool to track your cluster’s security score. It’s integrated with Azure Security Center so enabling it in AKS is just a matter of a few clicks. However, be aware that it can generate huge costs. At the time of writing Defender for AKS costs 2$/VM core/Month, so for a cluster with 100 cores, it adds an extra 200$ to the bill. Consider using open source tools like Kube-Bench and Falco.
This guide was written by Adam Płaczek, DevOps Engineer at Zartis. If you would like more information or have questions on the topic, feel free to reach out now!
Don’t forget to check our tech blog for technical deep dives on topics such as PowerBI, ELK Stack, Blazor and more.

